Amigurumi crochet owl on the left, handmade with cotton yarn. On the right, crafting materials including three skeins of yarn, scissors, a crochet hook, pins, and a needle, neatly arranged for making the owl.

Free Owl Crochet Pattern

Are you searching for a free owl crochet pattern? If so, you’re in the right place! This free crochet pattern will guide you step by step to create an adorable amigurumi owl—perfect as a gift or a charming decoration. Whether you’re looking for a wise companion or a cute handmade keepsake, this pattern is both fun and easy to follow.

About the Design

Owls have long been symbols of wisdom and mystery, making them an ideal inspiration for this delightful crochet project. With this pattern, you’ll bring a charming little owl to life. We’ll start with the head and body. Then, we’ll add the toes, wings, eyes, and beak to complete the perfect finishing touches.

Not only does this owl make a whimsical addition to any collection, but it’s also a thoughtful handmade gift for nature lovers and bird enthusiasts alike!

Materials & Details

To get started, you can use any yarn you prefer. However, for this project, I used sport-weight cotton yarn paired with a 2 mm crochet hook.

  • The finished owl measures approximately 6” (15 cm) tall.
  • The final size will vary based on your yarn and hook choice, but be sure to crochet a dense fabric so the stuffing doesn’t show through.
  • This pattern is worked entirely in single crochet (US terms) using continuous spirals without joining rounds. To keep track of your progress, a stitch marker is highly recommended.
  • The design features four colors: brown, green, orange, and white.

Ready to start? Grab your yarn and hook, and let’s crochet your own adorable owl today!

Materials needed to crochet amigurumi owl, such as yarn in green, orange, brown and white, scissors, crochet hook, soft stuffing, plastic eyes, sewing pins and a tapestry needle.

Materials  to crochet the owl

  • 2.5 mm crochet hook
  • sport-weight cotton yarn like Schachenmayr Catania in brown, green, orange and white
  • soft stuffing
  • a pair of 8 mm sew-on black eyes
  • long tapestry needle, scissors and sewing pins (Image 1)


Abbreviations

ch(s) – chain(s)
yo – yarn over
sc – single crochet
sl st – slip stitch
inc – single crochet increase
dec – single crochet decrease
st(s) – stitch(es)
Rnd – round

Starting to crochet owl, first 3 rounds of owl's head finished.

Head

Begin at the top of the head and work down toward the body.

Rnd 1: Loosely chain 7 (working loosely will make the first two rounds easier). Starting in the second chain from the hook, sc 4, then inc in each of the next 4 chains. In the last chain, work 5 sc. Now, continue working along the other side of the foundation chain in the free loops: inc in each of the next 5 chains. (27 sts) (Image 2)

Rnd 2:  (sc in 2 sts, inc in next st) 9 times (36)
Rnd 3: (sc in 3 sts, inc in next st) 9 times  (45) (Image 3)
Rnd 4: (sc in 4 sts, inc in next st) 9 times  (54)
Rnd 5: (sc in 5 sts, inc in next st) 9 times  (63)
Rnd 6-17: sc in each stitch around (63)


Crocheting owl - head finished

Start decreasing:

Rnd 18: (sc in 5 sts, dec) 9 times (54)
Rnd 19: (sc in 4 sts, dec) 9 times (45)
Rnd 20: (sc in 3 sts, dec) 9 times  (36)
Rnd 21: (sc in 2sts, dec) 9 times  (27)
Rnd 22: (sc in next st, dec) 9 times(18)

Stuff the head. (Image 4)

Rnd 23: sc in each stitch around (18)

The head is finished.

Crochet owl, work in progress

Body

Continue with green yarn.

Rnd 24: (sc in 2 sts, inc in next st) 6 times (24)
Rnd 25: (sc in 3 sts, inc in next st) 6 times (30)
Rnd 26: (sc in 4 sts, inc in next st) 6 times (36)
Rnd 27: (sc in 5 sts, inc in next st) 6 times (42)
Rnd 28: (sc in 6 sts, inc in next st) 6 times (48)
Rnd 29: (sc in 7 sts, inc in next st) 6 times (54)
Rnd 30-40: sc in each stitch around (54) (Image 5)

Crochet owl's legs, work in progress

Now start decreasing:

Rnd 41: (sc in 7 sts, dec) 6 times (48)
Rnd 42: (sc in 6 sts, dec) 6 times (42)
Rnd 43: (sc in 5 sts, dec) 6 times (36)
Rnd 44: (sc in 4 sts, dec) 6 times(30)
Rnd 45: (sc in 3 sts, dec) 6 times (24)

Stuff the body!

Ensure your stitch marker is placed in the last stitch you just made. Sc in next 11 sts (Image 6)

Crocheting owl's legs

Create Leg Openings

The next 3 stitches will create the leg openings by dividing the work in half. Slip stitch into the marked stitch. (Image 7)

Remove the marker. Then, flatten the body by pressing the front and back sides together, aligning the stitches. Now, work 2 more slip stitches through both layers as follows:

  • First, insert your hook into the next stitch and the corresponding stitch behind it (13th stitch from the hook), yarn over, and pull through – second sl st made.
  • Again, insert your hook into the next stitch and the corresponding stitch behind it (12th stitch from the hook), yarn over, and pull through – third sl st made. (Image 8)

These stitches should be centered with the head. If you imagine drawing a vertical line upward from the middle slip stitch, it should divide both the body and head into equal halves.

Without turning, continue working single crochet around the leg opening as follows.

Crocheting owl's legs

Right leg

Rnd 46: ch 1 (Image 9), sc in the next 9 sts, then sc in the stitch where the slip stitch was made. (10 sts)

Rnd 47: switch to orange yarn and sc in each st around (10)
Rnd 48-50: sc in each st around (10)

Sl st in the next stitch and cut the orange yarn, leaving a long tail for sewing the foot with toes to the leg. Pull the yarn through the final loop to fasten off.

Now is the perfect time to add more stuffing to the body through the left leg opening. I use a Chinese stick to push the stuffing down through the small hole (Image 10).

Add as much stuffing as needed until you’re happy with the shape – I personally love a plump, round tummy!

Free crochet owl pattern on the left, attaching new yarn to begin making the leg; on the right, the completed head, body, and legs of the amigurumi owl.

Left leg

Rnd 46: attach new green yarn in the first st on the right side (Image 11), chain 1, and sc in next 10 sts. (10)
Rnd 47: switch to orange yarn and sc in each st around (10)
Rnd 48-50: sc in each st around (10)

Weave in yarn ends.

Fasten off leaving a tail long enough to sew fingers to the leg. Stuff legs. (Image 12)

Crocheting owl's toes

Toes

With magic ring and orange yarn

Rnd 1: 4 sc into center of ring. (4)
Rnd 2: (inc) 4 times (8)
Rnd 3: (sc in next st, inc in next st) 6 times(12)
Rnd 4 and 5: sc in each stitch around (12)
Rnd 6: (sc in next st, dec) 4 times (8)

Sl st in next st and fasten off. Stuff the toe and weave in the yarn end. The first toe is now complete! If stuffing is difficult at this stage, you can leave it unstuffed and stuff it after finishing Round 9.

Repeat Rounds 1-6 once more to create a second toe identical to the first. Then, repeat Rounds 1-6 again to make the third toe, but this time, do not cut the yarn but continue with round  7.


Close up of crocheting together the 3 owl's toes

Joining Toes

Rnd 7: First, place the marker in the next stitch to mark the joining, and then sc in that marked stitch. (Image 13)

Importantly, do not remove the marker, as you’ll make another sc in the same stitch on your way back.

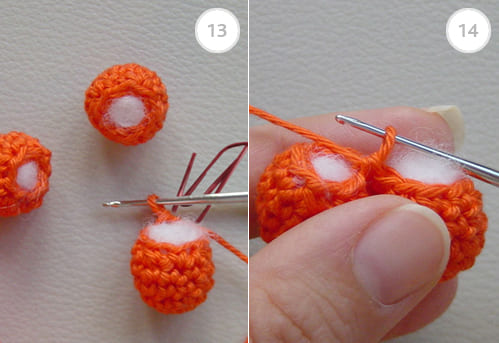
Next, join the second toe with a sl st: to do this, insert the hook into the first stitch of the second toe, yarn over, and pull through both loops on the hook (Image 14).

After that, sc in the next 2 stitches of the second toe. Following this, place another marker in the next stitch to mark the joining, and then sc in the marked stitch. Be sure not to remove the marker.

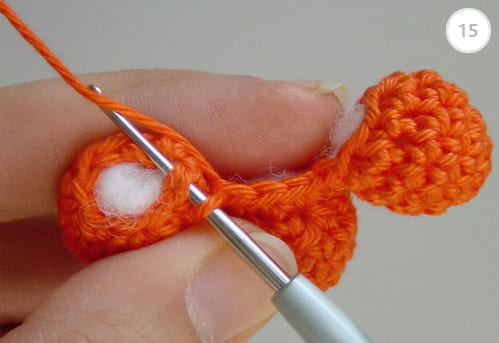
Now, join the third toe in the same way you joined the second toe: begin by inserting the hook into the first stitch of the third toe, yarn over, and pull through both loops on the hook. (Image 15) Then, sc around in the remaining 7 sts of the third toe.

To tighten the stitches and prevent gaps, sc one more time in the first stitch on the third toe (where the sl st was worked), and then sc again in the stitch marked with the marker on the second toe. Finally, remove the marker.

Close up of crocheting together the 3 owl's toes

Sc in each of the next 4 sts of the second toe. After that, once again, to tighten the stitches, sc one more time in the next stitch of the second toe (the stitch where the sl st was worked). Then, sc in the stitch marked with the marker on the first toe. Next, remove the marker and sc in each of the next 4 sts of the first toe. (28) (Image 16)


Feet

Continue to make the feet.

Rnd 8 and 9: sc in each st around (28)

Stuff the toes if you haven’t done so already.

Start decreasing:

Rnd 10: (dec) 14 times (14)

Crocheting an owl: on the left, finished toes; on the right, the completed head, body, legs, and toes of the amigurumi owl.

Rnd 11 and 12: sc in each st around (14)

Decrease again:
Rnd 13: (dec) 7 times (7)
Rnd 14: sc in each st around (7)

Fasten off. Using a tapestry needle, weave the tail through the front loops of the remaining 7 stitches and pull it tight to close.

Repeat steps 1-14 to make the toes and foot for the other leg.

First, sew the feet onto the legs, making sure they are securely attached. Use the image as a guide to ensure proper placement. To achieve a natural look, slightly turn the left foot to the left and the right foot to the right. This adjustment will help prevent them from overlapping when sewn. (Image 17 and 18)

Amigurumi Owl in Progress – ASewing eyes to the head

Eye – make 2

With magic ring and white yarn

Rnd 1: 5 sc into center of ring. (5)
Rnd 2: (inc) 5 times (10)
Rnd 3: (sc in next st, inc in next st) 5 times (15)
Rnd 4: (sc in 2 sts, inc in next st) 5 times (20)

Fasten off with invisible finish off.

Make another circle using the same steps 1-4. Pin the circles to the head to determine the best placement, then whipstitch them in place.

To begin, sew the plastic eyes in place using a long needle and brown yarn—the same yarn used for the head. First, insert the needle through the bottom back of the head, leaving a tail for securing. Then, bring the needle out at the center of the white circle you just attached. Next, pass it through the plastic eye and back through the white circle. After that, guide the needle to the center of the second white circle, then through the second plastic eye. Finally, bring the needle back down through the second white circle and out at the exact same spot where you first inserted it at the bottom of the head. (Image 21)

Now pull the yarn ends tightly and knot them securely.

Crocheting owl's wing

Wings – make 2 of each color

With magic ring and brown yarn

Rnd 1: 8 sc into the ring (8)
Rnd 2: (inc) 8 times (16)
Rnd 3: (sc in next st, inc in next st) 8 times (24)
Rnd 4: (sc in next 2 sts, inc in next st) 8 times  (32)
Rnd 5: (sc in next 3 sts, inc in next st) 8 times  (40)

Sc in next st, and fasten off with invisible finish off.

Repeat the steps 1-5 with orange yarn.

Place the orange wing on top of the brown wing with the wrong sides facing each other, aligning the stitches. Then, sew the wings together by working sc through both thicknesses around the edge. (Image 19)

Sewing owl's wing to the body.

Once you reach the end, cut the yarn, leaving a tail long enough to sew the wing to the body.

Now, make the second wing following the same steps as for the first wing.

Finally, sew the upper half of the wing to the body. (Image 20)

Crocheting an owl - embroidering beak.

Beak

Using a long tapestry needle and orange yarn, insert the needle at the back of the head, coming out where you want to begin. Stitch the outline of the beak with 3 long stitches. Then, fill in the outlined beak with vertical stitches (Image 22). Finally, add 4-5 extra horizontal stitches at the top of the beak.

Your owl is finished!

Make sure to pop in to the Ravelry Project page to share your owl photos and admire everyone else’s crochet handiwork too!

Happy Crocheting!

You Might Like

Subscribe to
Pepika Newsletter

Join our community of amigurumi lovers and stay up-to-date with the latest amigurumi designs, free patterns, and exclusive discounts.