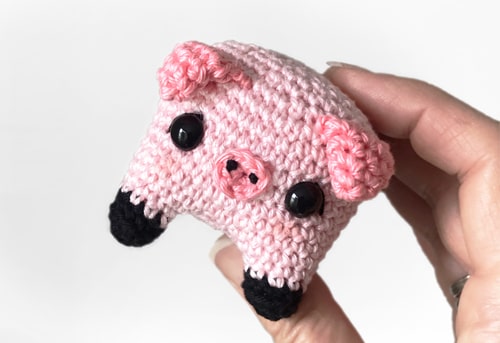
A lovely little amigurumi pig wearing a shorts – easy to follow pattern for crocheters of all levels.
The pattern works well with a variety of yarns, and the sample in this tutorial was made using sport-weight cotton yarn (100g/250m/273yd). With a 2.5mm crochet hook and sport-weight yarn, your finished piggy will stand at approximately 6 cm/2.5″ tall. This fun and quick project takes just 2-3 hours to complete, making it great option for a lazy afternoon or as a cute gift idea for your friends and family. Use your finished amigurumi pig as a charming bag accessory, as a keychain, or simply as a cute amigurumi toy.
And don’t forget to share a photo of your creation on Instagram! Just use hashtag #pepikapattern @pepikasanda in your post and show off your adorable piggy to the world. I’m looking forward to seeing it!
– 2.5 mm crochet hook
– baby pink – 11g/27.5m/30yd
– pink – 6g/15m/16yd
– black – 3g/7.5m/8yd
– gray – 3 gr/7.5m/8yd
– soft stuffing
– a pair of 8 mm black eyes (or smaller)
– long tapestry needle, scissors and sewing pins
ch(s) – chain(s)
st(s) – stitch(es)
rnd – round
sc – single crochet
inc – single crochet increase
dec – single crochet decrease
The body is worked from bottom up. We’ll first make legs, then join them together and continue making the bottom part of the body.
To make the first leg, with black yarn and magic ring:
Rnd 1: 6 sc into the ring (6)
Rnd 2: (sc in next st, inc) (9)
Rnd 3: working just in back loops, sc around (9)
Change the color to baby pink
Rnd 4: sc around (9)
Rnd 5: (sc in 2 sts, inc) 3 times (12)
Rnd 6: (sc in 3 sts, inc) 3 times (15)
Fasten off with invisible join. Repeat the same to make 3 more legs but do not fasten off the last leg. Place the stitch marker on the loop so you know where to join at the end of the next round.
In the next round we will join the legs together by crocheting into 4 stitches (leaving 11 stitches unworked) on each leg. Then we’ll continue to finish the bottom part of the body.
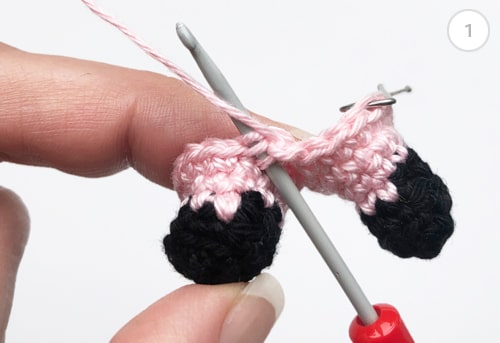
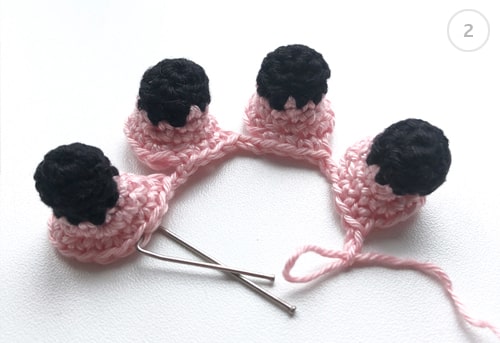
Rnd 7: sc in next 4 sts, ch 2, sc in 4 sts of the second leg (Image 1), ch 2, sc in 4 sts of the third leg, ch 2, sc in 4 sts of the fourth leg, ch 2. (24) (Image 2)
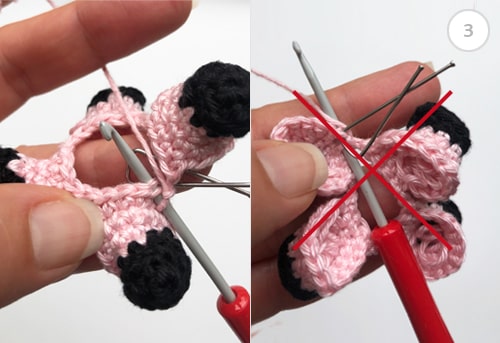
Rnd 8: We’ll now join all 4 legs by working a sc into the marked stitch.
But before we do that we should be careful not to twist the chains. Also, we want the right side facing out so we should turn the legs up so the right side of the work is facing out, and then make a sc into the marked stitch to join all 4 legs. (Image 3)
Place the stitch marker on the stitch you just made. That’s the first stitch of the round.
Continue to make sc in all stitches and back loops of chains (24)
Rnd 9: (sc in 2 sts, dec) 6 times (18)
Rnd 10: (sc in next st, dec) 6 times (12)
Rnd 11: dec 6 times (6)
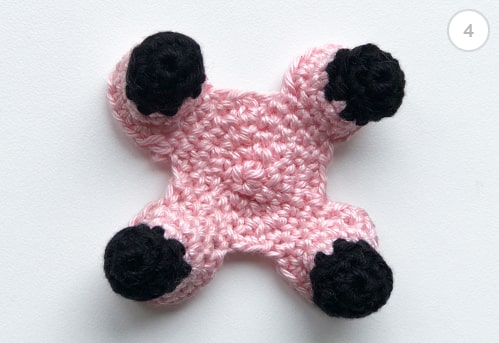
Fasten off! With a tapestry needle, weave the tail through the front loops of the remaining 6 stitches and pull it tight to close. Weave in the yarn end. (Image 4)
We finished the bottom part of amigurumi pig’s body and the most difficult part. Let’s now make the upper part of the body.
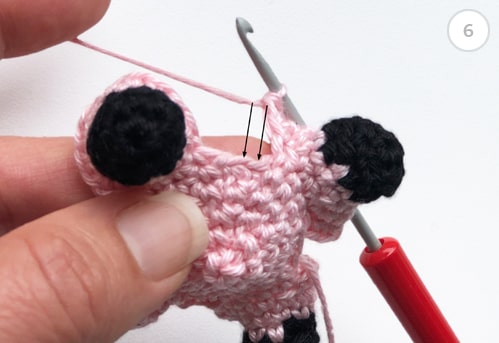
Sc into unworked front loops of 2 chains, make tight stitches so there is no gap.
In the next round we’ll crochet together the unworked stitches and chains from round 7.
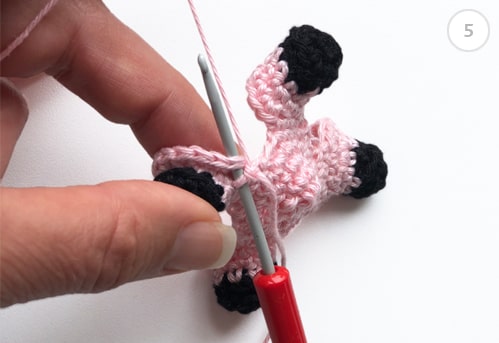
Rnd 7: join baby pink yarn to first unworked stitch on any of the legs (Image 5) and sc around (sc in 11 unworked stitches on each leg and in 2 free front loops on chains between legs). When working in front loops on chains make sure to make tight stitches so there are no big gaps between the legs. (Image 6) (52)
Rnd 8-13: sc around (52)
Rnd 14: (sc in 11 sts, dec) 4 times (48)
Rnd 15: (sc in 6 sts, dec) 6 times (42)
Rnd 16: (sc in 5 sts, dec) 6 times (36)
Rnd 17: (sc in 4 sts, dec) 6 times (30)
Rnd 18: (sc in 3 sts, dec) 6 times (24)
If using safety eyes, insert them now between rounds 10 and 11, 9 stitches apart. Stuff the legs firmly then stuff the body.
Rnd 19: (sc in 2 sts, dec) 6 times (18)
Rnd 20: (sc in next st, dec) 6 times (12)
Rnd 21: dec 6 times (6)
Fasten off!
With a tapestry needle, weave the tail through the front loops of the remaining 6 stitches and pull it tight to close. Weave in the yarn end.

With magic ring:
Rnd 1: 9 sc into the ring (9)
Fasten off with invisible join.
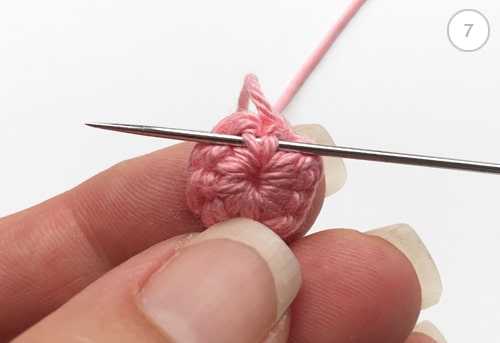
Now, flip the snout so that the back side is facing up. Take a moment to examine the last round, identifying the vertical bars (posts) of the 9 stitches you’ve just made. Each stitch has 2 vertical bars forming a “V” shape. To attach the snout, use a tapestry needle to weave under these vertical bars. (Image 7)
If you’re opting for sew-on eyes, now’s the time to sew them between rounds 10 and 11 of the body, ensuring they are 9 stitches apart.
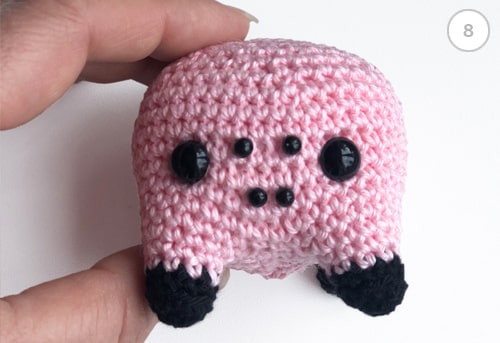
Using pins, mark the area between the eyes where you’ll stitch the snout. (Image 8) As the snout consists of 9 stitches, we’ll attach it evenly by placing 3 stitches between rounds 11 and 12 of the body, 2 stitches downward to round 9, 2 stitches between rounds 9 and 10, and 2 stitches upward to round 12.
For the nostrils on the snout of the amigurumi pig, you will need only a small length of black yarn to embroider two small French knots.Use thin black yarn (or split 4 ply yarn and use just two strands). (Image 9)
If you’re unfamiliar with French knots, you can opt to embroider two straight lines for the nostrils. Alternatively, sewing two small beads in place of embroidery is also an option.
With magic ring:
Rnd 1: 4 sc into the ring (4)
Rnd 2: (sc in next st, inc) 2 times (6)
Rnd 3: (sc in 2 sts, inc) 2 times (8)
Rnd 4: (sc in 3 sts, inc) 2 times (10)
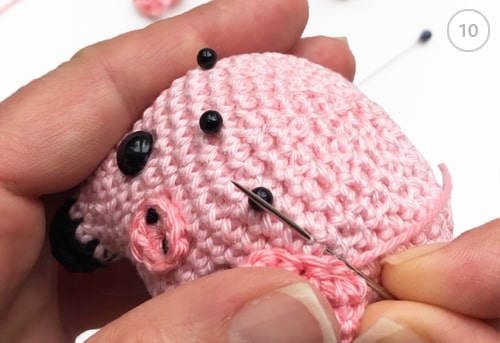
Flatten opening close and sc through both layers in 5 sts. (5) Fasten off leaving tail to sew to the head. Sew the ears to the head, between rounds 14 and 15, 5 stitches apart. (Image 10)
Leaving a long yarn tail which we’ll use later to sew tail to the body, ch 10, inc in 2nd ch from the hook and in next 8 chs (18)
Fasten off leaving a long yarn end.
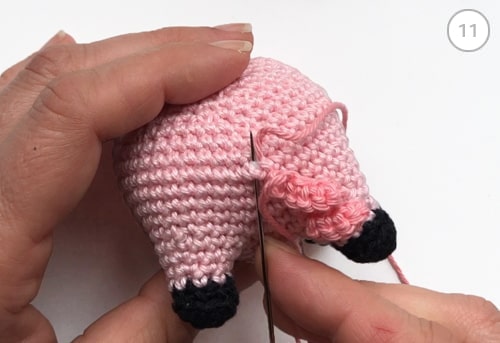
Use yarn ends to sew the tail to the body. Thread the tapestry needle with one yarn end and insert it in the center back, between rounds 11 and 12, coming out one round above. Then thread the needle with another yarn end, insert it one stitch away, coming out at the same spot as the first yarn end. Take the two yarn ends, make a double knot and hide them inside the body. (Image 11)
Let’s add the final touches to bring our adorable amigurumi pig to life!
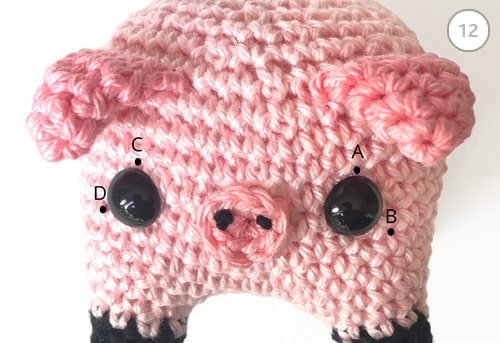
Using a tapestry needle and black yarn, carefully embroider straight stitches on the outer sides of the eyes, creating a charming expression (from A to B, and from C to D). (Image 12)
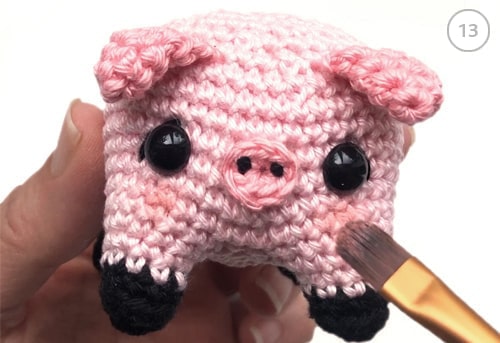
Afterwards, it’s time to give our piggy some rosy cheeks. Simply add a touch of blush to the cheeks, adding an extra dash of cuteness to the finished product. (Image 13)
Now, let’s turn our attention to making the perfect pair of shorts for our piggy, completing its endearing look.
I understand if you’re feeling a bit impatient by now, but hang in there just a little longer. In about half an hour more, our piggy will be fully finished and ready to bring smiles to all who see it.
Make first 2 rounds in gray, then change color to pink and continue to change color every second round.
Rnd 1: ch 40, being carefull not to twist the chain, sc in first ch to join and in next 39 chs (40)
Rnd 2 – 5: sc around (40)
In the next round we’ll make opening for the legs
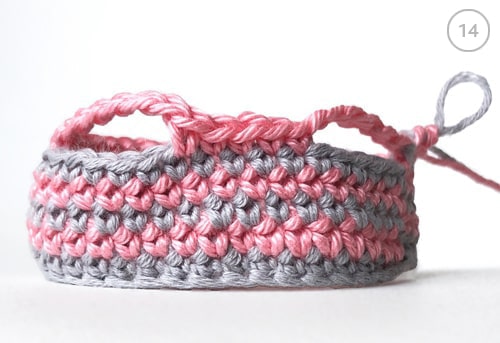
Rnd 6: ch 6, skip 6 sts, sc in next 5 sts, ch 6, skip 6 sts, sc in next 23 sts (40) (Image 14)
Rnd 7: sc around in all chs and sts (40)
Rnd 8: (sc in 2 sts, dec) 10 times (30)
Rnd 9: (sc in 3 sts, dec) 6 times (24)
Rnd 10: (sc in 2 sts, dec) 6 times (18)
Rnd 11: (sc in next st, dec) 6 times (12)
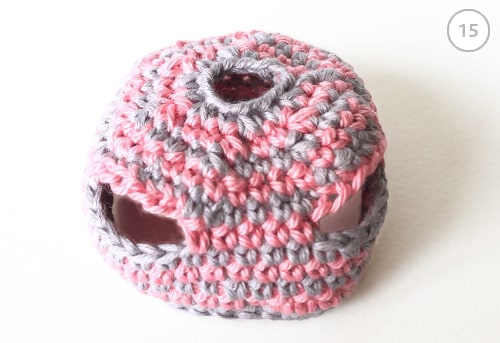
Fasten off! With a tapestry needle, weave the tail through the front loops of the remaining 12 stitches and pull it tight to close. Weave in the yarn end. (Image 15)
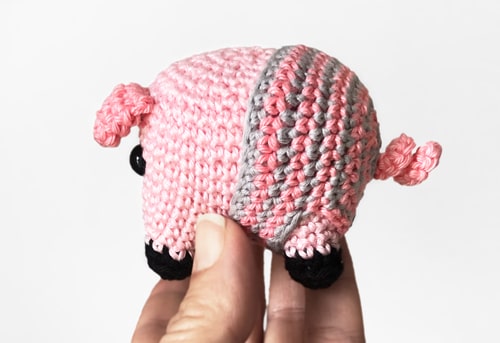
Congratulations! You’ve made it to the end of our amigurumi pig pattern. I hope your little piggy turned out just as you imagined – cute, cuddly and full of personality. I understand that it may have been a bit challenging, but the end result is undoubtedly worth it, isn’t it? Now that the piggy is completed, you can get creative with its use – whether as a keychain, bag charm, or any other way you can imagine! The possibilities are truly endless.
Don’t forget to share the photos of your amigurumi pig with me on Instagram by tagging @pepikasanda. I can’t wait to see your oink-mazing piggy in all its glory. 🐷
Join our community of amigurumi lovers and stay up-to-date with the latest amigurumi designs, free patterns, and exclusive discounts.
Pepika crochet patterns are for personal use only. You may sell finished items made with my patterns as long as they are made by yourself. I just ask to give me credit as the designer by stating that it is a Pepika pattern and to link back to my shop. To eliminate any uncertainty about how you can use amigurumi crochet patterns on this site, please read the full copyright policy.
Copyright 2007-2025 Pepika.com | All Rights Reserved