Searching for a sweet crochet toy and charming addition to your amigurumi collection? Take a look at this free crochet bear pattern that will charm your little one and become their new best friend.
This crochet teddy bear is made with 2.5 mm crochet hook using Schachenmayr Catania cotton yarn. The bear parts are crocheted separately and then filled with soft stuffing before being stitched together to complete the teddy bear.
Standing at a sweet 7 inches (18 cm) tall, this crochet bear is the perfect size for little arms to snuggle and adore. And the best part? You only need a small amount of yarn in three different colors, some soft stuffing, and a pair of 9mm black eyes to bring this adorable creature to life. It’s a budget-friendly project that’s big on love and guaranteed to bring smiles all around.
So, whether you’re an experienced crocheter looking for your next project or a newbie eager to try your hand at something new, this free crochet bear pattern is sure to delight both you and your little one. So, grab your hook, gather supplies, and embark on a journey of creativity. Let the crocheting begin!
– 2.5 mm crochet hook
– Schachenmayr Catania (leinen) – 30g/75m/82yd
– Schachenmayr Catania( graublau) – 10g/25m/27yd
– Schachenmayr Catania( marone) – 5g/12.5m/13yd
– soft stuffing
– a pair of 9 mm black eyes
– long tapestry needle, scissors and sewing pins
ch(s) – chain(s)
sc – single crochet
sl st – slip stitch
inc – single crochet increase
dec – single crochet decrease
st(s) – stitch(es)
Rnd – round
To make the left leg, with magic ring:
Rnd 1: 6 sc into the ring (6)
Rnd 2: (inc) 6 times (12)
Rnd 3 – 7: sc around (12)
Rnd 8: (inc) 3 times, sc in 9 sts (15)
Rnd 9 & 10: sc around (15)
Rnd 11: sc in 3 sts, (inc) 2 times, sc in 6 sts, inc, leave last 3 sts undone (18)
Fasten off leaving a tail to sew gap between the legs later.
Make the right leg the same way as left but do not fasten off. In the next round you will join the legs together by crocheting them into one round and continue making the body.
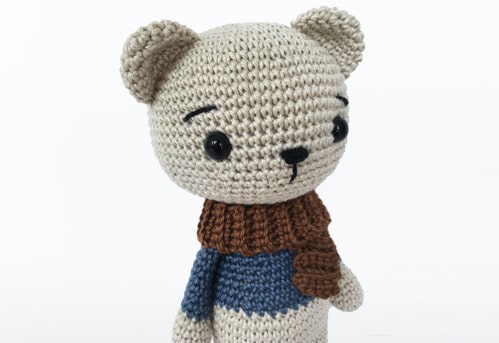
Rnd 12: sc in first st of the left leg and in next 17 sts, sc in first st of the right leg and in next 17 sts. (36) (Image 1)
With yarn tail from the left leg sew the gap between the legs.
Rnd 13: sc around (36)
Rnd 14: (inc) 2 times, sc in 33 sts, inc (39)
Rnd 15: inc, sc in next st, inc, sc in 34 sts, inc, sc in next st (42)
Rnd 16 – 18: sc around (42)
Rnd 19: sc in 12 sts, change to blue yarn, sc in 30 sts
Rnd 20: (dec) 2 times, (sc in next st, dec) 2 times, sc in 27 sts, dec, sc in next st, dec (36)
Rnd 21 & 22: sc around (36)
Stuff legs and continue stuffing as you go.
Rnd 23: (sc in 4 sts, dec) 6 times (30)
Rnd 24 & 25: sc around (30)
Rnd 26: (sc in 3 sts, dec) 6 times (24)
Rnd 27 & 28: sc around (24)
Rnd 29: (sc in 2 sts, dec) 6 times (18)
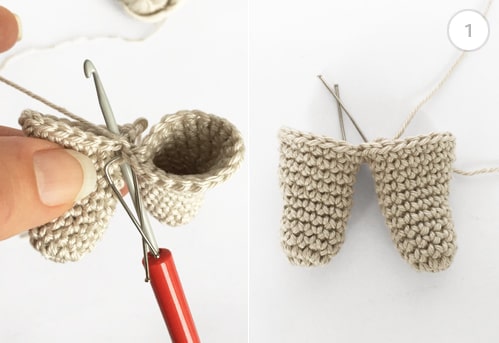
Fasten off leaving long tail for sewing. (Image 2)
With magic ring:
Rnd 1: 6 sc into the ring (6)
Rnd 2: (inc) 6x (12)
Rnd 3 – 6: sc around (12)
Rnd 7: dec, sc in 10 sts (11)
Change to blue yarn.
Rnd 8 – 11: sc around (11)
Rnd 12: dec, sc in 9 sts (10)
Rnd 13 – 18: sc around (10)
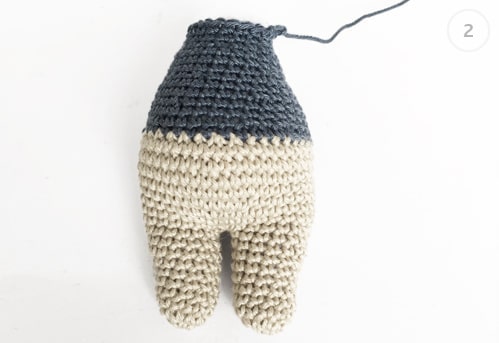
Flatten opening closed and sc through both layers in next 5 sts. Fasten off leaving a tail for sewing. Sew arms on both sides of the body between rounds 27 and 28. (Image 3)
Beginning at the top of the head, with magic ring:
Rnd 1: 6 sc into the ring (6)
Rnd 2: (inc) 6x (12)
Rnd 3: (sc in next st, inc) 6 times (18)
Rnd 4: (sc in 2 sts, inc) 6 times (24)
Rnd 5: (sc in 3 sts, inc) 6 times (30)
Rnd 6: (sc in 4 sts, inc) 6 times (36)
Rnd 7: (sc in 5 sts, inc) 6 times (42)
Rnd 8: (sc in 6 sts, inc) 6 times (48)
Rnd 9: (sc in 7 sts, inc) 6 times (54)
Rnd 10: (sc in 8 sts, inc) 6 times (60)
Rnd 11: (sc in 9 sts, inc) 6 times (66)
Rnd 12: (sc in 10 sts, inc) 6 times (72)
Rnd 13 – 19: sc around (72)
Decrease:
Rnd 20: (sc in 10 sts, dec) 6 times (66)
Rnd 21: (sc in 9 sts, dec) 6 times (60)
Rnd 22: (sc in 8 sts, dec) 6 times (54)
Rnd 23: (sc in 7 sts, dec) 6 times (48)
Rnd 24: (sc in 6 sts, dec) 6 times (42)
Rnd 25: (sc in 5 sts, dec) 6 times (36)
Rnd 26: (sc in 4 sts, dec) 6 times (30)
Note: If using safety eyes you can insert them now. Insert them 14 sts apart, between rounds 17 and 18.
Stuff the head. Continue stuffing after each new round.
Rnd 27: (sc in 3 sts, dec) 6 times (24)
Rnd 28: (sc in 2 sts, dec) 6 times (18)
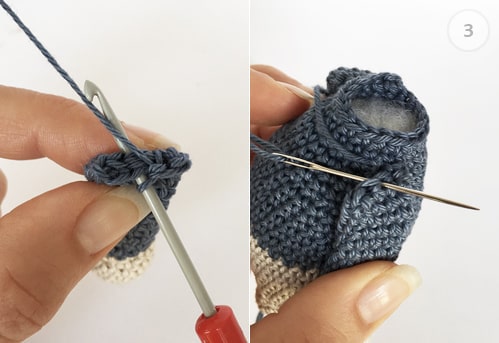
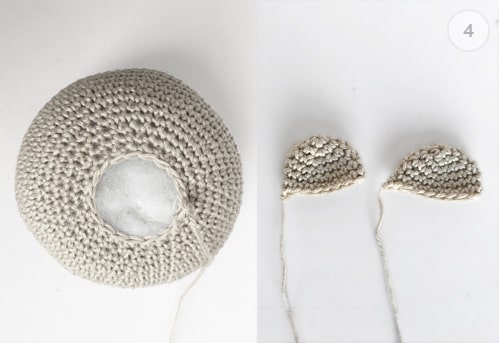
Fasten off. (Image 4)
Starting from the top, with magic ring:
Rnd 1: 6 sc into the ring (6)
Rnd 2: (inc) 6x (12)
Rnd 3: (sc in next st, inc) 6 times (18)
Rnd 4 – 6: sc around (18)
Fasten off leaving a tail for sewing. (Image 4)
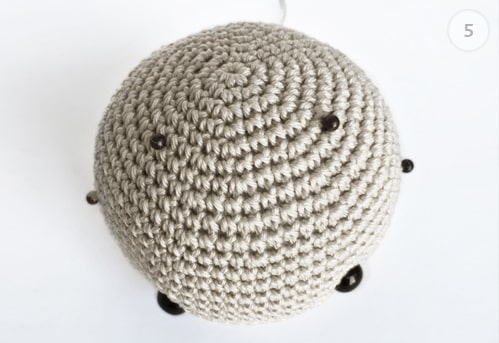
Attach ears to head between rounds 6 and 15. To make it easier mark with pins the first and last point on the head where the ears should be attached. (Image 5)
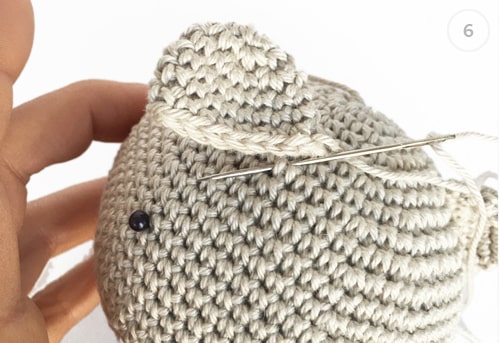
Flatten the bottoms before sewing and sew them to the head, inserting the needle through both stitches. (Image 6)
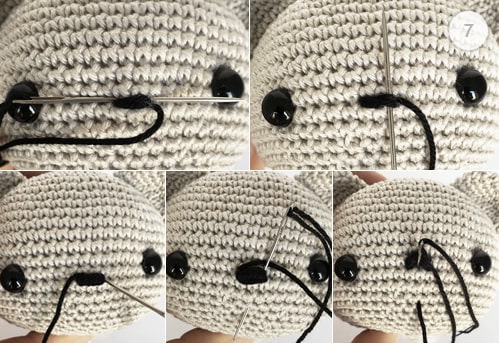
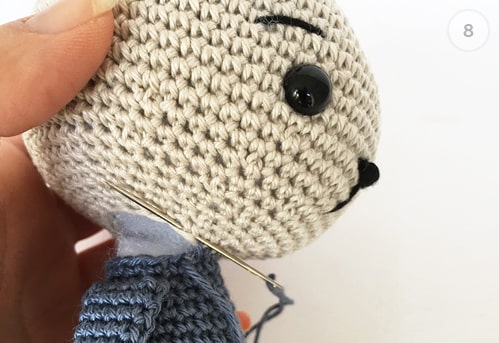
With tapestry needle and black yarn, insert the needle under the head and bring it up to make 3 horizontal stitches centered between the eyes. Always insert and bring up the needle in the same hole. Now go with the needle vertically under and over the horizontal stitches until they have been covered. Make 2 curved stitches around the nose. To finish, make a vertical line 3 stitches long going straight down from the center of the nose. (Image 7)
Insert the needle out through the head opening and knot the yarn ends together.
With tapestry needle and black yarn, make 2 straight stitches above the eyes for eyebrows.
With tapestry needle and yarn tail sew the head to the body. (Image 8)
Working in rows:
Row 1: Chain 6, sc in second chain from hook and in next 4 chs (5)
Working just in back loops:
Row 2 – 60: ch 1, turn, sc in 5 sts (5)
Fasten off and weave in yarn ends.
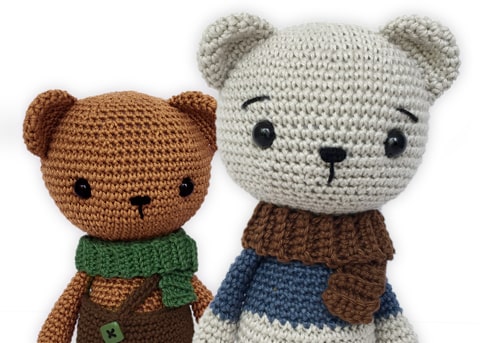
Join our community of amigurumi lovers and stay up-to-date with the latest amigurumi designs, free patterns, and exclusive discounts.
Pepika crochet patterns are for personal use only. You may sell finished items made with my patterns as long as they are made by yourself. I just ask to give me credit as the designer by stating that it is a Pepika pattern and to link back to my shop. To eliminate any uncertainty about how you can use amigurumi crochet patterns on this site, please read the full copyright policy.
Copyright 2007-2025 Pepika.com | All Rights Reserved